Tuesday, November 22, 2016

My New Crafting Toy

I'm very excited to share with you that I got a brand new crafting toy - the Silhouette Cameo 3!  I've never used a cutting machine before, and I LOVE it!  So far I've only used it to cut purchased files and do a bit of sketching, but it can do so much more.  It has really opened up a whole new level of paper crafting, and I look forward to making many projects with it 😀

The first projects I made were from a company called Little Scraps Of Heaven.  They have the cutest cut files in many different styles, so I started collecting all the ones I thought I could use.  I made a series of little Halloween kids all dressed up in their costumes - they all came together in one purchase and I created them one by one.

Frankenstein:

Frank's Bride:  

Dracula:  

Witch:  

Red Devil:  


Werewolf:  

I haven't yet made a scrapbook layout with all of them, but when I do I will share it with you.

When I decided to start making YouTube videos, I focused on Halloween themed items because the holiday was fast approaching.  I have always loved Halloween decorations and designs, so it was a great opportunity to really play with them.  I made spiders:  PIC

And bats:

And witchy things:


And even a haunted house:


Friday, November 4, 2016

Settling In


Well, after many long months of extreme stress, we are finally settled into our new home!  I can't even describe how happy we are to be here.  I really didn't think that we would ever have a chance to live in such a beautiful home, but we really did it.  There is so much room for all of us to spread out and relax, but still come together for meals in the eating nook and TV time in the spacious family room.  I feel that we have been truly blessed, and I am eternally grateful.

On a related note, I was able to turn one of the bedrooms into my very own craft room!  Finally I have a dedicated space to keep ALL of my many craft supplies, and can escape to the joy of crafting whenever I get a chance.  This has to be my favorite thing about our new home!  And Dave is glad that he doesn't have to look at all of my crafting clutter everywhere (hahaha!)  I have plenty of shelving, a brand new desk, and even a folding table for spreading out with big projects.  It's definitely my happy place, and I look forward to decorating it and making it a very feminine and creative space.

During our big move, we had it really tough because we needed to sell our first house before we could purchase our new one.  Not only did we have to pack and store everything we possibly could, I had to part with virtually all of my needlework, lampwork glass, and paper crafting supplies.  I had one crochet hook and some yarn so I wouldn't lose my mind completely, but that was it.  I guess I never fully understood how much creativity was a part of my life and my soul.  My stress level was steadily rising and I had no creative outlet to find relief.  I hope and pray that I will never have to go through another extended period like that again.  It was so much harder than I ever imagined!

Once I get a bit more coordinated, I will be able to share some of the projects that I have completed and a few more I've started.  I hope that you will check in with my blog once a week or so to catch up on my updates.  I'm starting up my YouTube channel and have already posted some videos, so please check them out.  It's a lot of fun - I almost feel like I'm on TV!

My very own YouTube channel


Thursday, July 14, 2016

Mid-July Update


Hello, hello!  We are getting much closer to wrapping up this whole moving thing.  I don't know if it's the crazy market, the sign of our times, or the fact that we're both buying AND selling, but this has been one wild and crazy ride!  The most recent wrinkle in the plan was waiting SEVEN WEEKS for the VA to send someone to do the appraisal on our home.  Can you imagine it?  After packing up about 90% of our belongings and putting it all in storage, and having our offer accepted on the new house, we all had to just SIT and WAIT for seven full weeks.  I consider myself a somewhat patient person (generally speaking), but come on - you can't blame me for almost losing my mind, can you?  It's crazy!

**Deep Breath**  Okay, now that the appraisal has been done we can finally move forward with the process.  It's going to get really crazy really fast, with a lot of hard work and final details hitting all at once.  But that's what we've been waiting for, and we are SO ready to do it!  I will check in again as time permits, but can't make any promises :-)  See you all soon!

Tuesday, June 28, 2016

A Latte Thanks


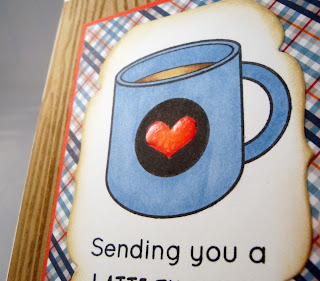
Today's featured card showcases another love of mine:  Coffee!  Not only do I love to drink it, but I am also slightly obsessed with coffee-themed stamps and dies.  This is from a Simon Says Stamp set which was offered in one of their monthly card kits.  The plaid pattern paper inspired the colors, and I found the perfect blue marker to color the mug.  I also added little pops of bright red with the heart and the layering paper, and set it all against a background made with my wood grain embossing folder.


After embossing the brown paper background, I used a sponging tool to dust the raised areas with a bit of brown ink.  This really accentuates the texture and adds a "rugged" finish that I like a lot.  I also dusted the edges of the cream card stock with the same brown to tie things together and contribute to the "casual" look of the design.  Tinting the edges of your pieces is such a simple and effective way to decorate your designs!  I just need to remember to do it..... ;-)


The finishing touch was to add a layer of Glossy Accents to the little red heart.  I just used a toothpick to nudge it into the point of the heart, and then set it aside to dry for a good long time.  The end result looks as though I added an enamel sticker to the mug.  So cute!

Supplies Used:

Monday, June 27, 2016

Late June Check-In


Hello friends!  I am just getting over another illness (4 days of high fevers - yuck!) but am finally feeling more like myself.  We are still waiting for the final step on our home sale, but have a current closing date of July 6th.  It's a shame that it crosses over the big holiday, but we've waited so many months that I really don't want any more delays.

I have been packing up my glass studio as my health (and the heat) permits, but that is a really big and time consuming job.  I also discovered I need some MUCH stronger tape - the heat is softening the adhesive and it's peeling away from the boxes!  I can't afford to have the tape fail and lose my precious glass, so I need to address that.  My paper craft supplies are still boxed up and in storage, which means I haven't been able to create for many weeks now.  It makes me sad to think about it, but I'm trying to remind myself that our long wait is almost over.

With my birthday a few weeks back, I was able to order a bunch of new stuff from MFT (My Favorite Things) from their June 2016 Release.  I will be diving in to those products as soon as I'm set up in the new house, and will share a project or two after that.  My eventual goal is to set up my camera and shoot some videos of my crafts, but we will see how that goes.  One step at a time!

I'm excited to share a new product that I discovered:  the Spectrum Noir Sparkle Glitter Brush Pens!

 I purchased the 3-pack of the Clear Overlay markers, which are similar to the Wink of Stella markers.  I had a WoS in Clear, and used it all over the place until it dried up.  I tried the "trick" of adding water to revive it and continue using it, but that didn't work too well for me.  I was hesitating to buy a replacement for quite a while, but then I discovered the Spectrum pens and I am hooked!  The sparkle is intense, consistent, and absolutely colorless - just a bright icy sparkle.  Some sparkly products have a blue tone, or silver, or even gold - but not these.  I can't recommend them enough for adding touches of sparkle to your designs :-)  They do come in many gorgeous colors as well, and if you'd like to see a fun video of them in use, please check out AmyR's YouTube video at her PrairiePaper&Ink channel.  She's awesome!!

Have a fun day!

Friday, March 25, 2016

Feeling Discouraged


I feel pretty discouraged today with the whole buying/selling process.  I won't go into all of the details, but right now I feel like I was misled and given false information.  If it turns out that even more information has been withheld or falsified, this whole move will fall apart and we'll be stuck here.  I won't even think about what that would mean to me, but let's just say that it wouldn't be pretty.  I need to try and remember that there are always options, and never just one path to reach your goal.  If we want something badly enough (and we do!), we will find a way to make it happen no matter who helps us get there.

So, I will dig deep and somehow rustle up the motivation to keep this process moving forward.  "Eye On The Prize" and all of that stuff, right?  I hope to have another update soon that is more positive than this one, but I needed to vent a bit.  Thank you for listening :-)

Monday, March 21, 2016

Quick Catch-Up


Hey, all!  I'm dropping in to say that we have been a bit preoccupied lately because we are starting our home search!  Woo hoo!  I can't possibly express how excited I am!  We've been feeling all sorts of growing pains lately...three people and one bathroom equals a very unhappy household.  Plus, we really need to have a garage for our vehicles.  We are extremely tired of parking outside with only a car-cover to protect us from the world.  Although we are blessed to have what we have, there comes a time when you just know that (if you can) you really need to look for another home.

This all started about 6 weeks ago or so, when I found myself visiting Zillow and Realtor.com to see what might be available in our city.  Lots and lots of homes in our area are short sales and foreclosures, with only a handful of properties being sold directly.  Then, one morning while sipping my coffee, I logged into Zillow and up pops a home that was "suggested" because of my previous search criteria.  This home was perfect!!  It was absolutely 100% ready to move into, with everything that was on our wish list.  I texted my husband and was excited to hear that he was interested, and he asked me to look into it.  Next thing you know, my mother and I had an appointment for a private viewing.  We went and loved it even more than the pictures could show.

Fast forward another week and we are gearing up for our pending move.  We missed out on the "dream home" that I wanted, but we are laser-focused on finding another one (maybe even better!)  There's a tremendous amount of work to be done, and of course all the daily work & chores, but it feels great to know how close we are to moving on.  I will be adding more cards and scrapping fun as time allows, but if I'm not around as much over the next month or two, you'll know why :-)


Saturday, March 5, 2016

"Hello" Red Butterfly

Hey there, crafty friends!  Today's post features another watercolored butterfly, this time with an assortment of coordinating papers.  I made the butterfly first, then sorted through my patterned paper packs and found something that worked perfectly!


The butterfly paper ties together all of the various colors, and the green polka dot paper and blue striped paper are from the same paper pack.  I bought a bunch of My Mind's Eye brand packs when they were on sale, and I'm pleasantly surprised by how versatile they are.


One of my favorite inks is VersaFine Onyx Black.  It is a very dark, rich black that stamps beautifully and can capture even the finest details in your stamps.  Since it's a pigment ink, it takes just a few minutes to dry, so I will usually sprinkle it with clear embossing powder and heat it.  This adds a touch of dimension and really makes your sentiments pop against a busy background.

Here's a supply list for this card:

Tuesday, February 23, 2016

Adorable Elephant

Hello, my friends!  Today I will be showing a Thank You card that I recently made featuring a super cute elephant stamp from MFT.  This chubby guy makes a great focal piece for all sorts of cards, but I decided I wanted to use the cute sentiment that goes with him.


The Sweet Safari stamp set comes with these cute leaves, so I decided to add some little flowers to the design that surrounds him.  You gotta watch me carefully sometimes - I will add flowers to anything and everything I can!  But I just really like them, and also the bright strawberry color, so there they are :-)


Here you can see that I popped up the elephant, the flowers, and a few of the leaves.  I love adding dimension, and when you have clusters it really helps separate the elements so that you don't have a "pile" of stuff on your card.  I also added a layered circle frame under the elephant to draw your eye to him.  Another common trick of mine is to make a couple of cards at the same time - since all the supplies are already out, it's super easy to duplicate!  Here I made the same card again, only I added some little blue flowers that I had on hand.


Supply list and shopping links:

Saturday, February 20, 2016

Butterflies On My Mind

Today's offering features another of my obsessions:  Butterflies!  You will see them pop up again and again in my creations because I love them and can never have enough :-)


This gorgeous butterfly was created the same way as the other one from my last post.  I used watercolor paper and some Distress Ink in three different shades, dipping the paper into the different colors and drying the ink after each layer.  Once it was done, I added the detail layer in black card stock and found a butterfly tag in my supply stash.  I brought more pink into the design with a panel behind the tag, mounted it on black, and then found a tone-on-tone orange patterned paper.  A scattering of Pretty Pink Posh sequins is the final detail.


I like to attach my sequins with Ranger's Multi Medium Matte, which is a creamy paste-like glue that dries clear and holds things VERY securely.  You can still get them off the paper, but you have to aggressively tear them off - they won't just fall off by themselves.  The only other dimension is a little bit of foam tape under the butterfly.


I picked a sentiment stamp from MFT that has a cute font and fits perfectly in the center of the tag.  Since I make so many cards of all sorts, I will often select a sentiment for aesthetic reasons.  Plus, a sentiment such as this one can have multiple meanings, and the message you add to the inside of the card can be anything you want :-)

Here's a partial list of the items I used and links where you can find them:

Friday, February 19, 2016

Wild Watercolor Butterfly

Hello, friends!  Todays offering is a little bit wild, but I was so in love with the background and the butterfly that I just had to put them together.


It all started with playing around with my Distress Inks and making some small watercolor pieces.  I used Peacock Feathers to start, then added splashes of Picked Raspberry.  Even though I was making multiple layers and drying between each, the water activated the colors and mixed them into the most GORGEOUS purples you have ever seen.  I wanted vibrant colors with clearly defined edges, which is accomplished by drying your inks between every application of ink.  It's SO much fun to play with your inks like this, and I encourage you to do the same :-)


This picture shows the background stamping with it's fabulous glitter and shine!  I got this look by stamping black paper with clear VersaMark ink and adding a glittered clear embossing powder.  The powder has the same turquoise/hot pink sparkles that are a perfect match for my butterfly.  Since the watercolor paper had some scraps left over, I used a heart-shaped die to cut out some little embellishments.  I glued them down and then covered them with glossy accents.


Isn't this the prettiest shot of the butterfly?  You can see all the variations in color, and the way that the background glitter coordinates so nicely.  I decided to add dots of white gel pen around the edges of the wings to help it stand out against the busy background.  I also found the perfect turquoise colored card stock to edge the background with and use in my sentiment piece.


And, of course, you know I HAD to bump up the butterfly on foam tape!  It's a favorite trick of mine that I will probably use on 99% of my card creations :-)  Embrace the foam!!

Here's a pretty complete list of all the materials I used for this project:

Wednesday, February 17, 2016

Stained Glass Roses

Good morning!  Today I'm feeling a little under the weather, so this will be a quick one.  I was browsing the deeper pages of one of my favorite online shops when I stumbled across the Elizabeth Craft Designs outline stickers.  I had always wanted to try them but never did.  Boy, are they fun!  They have a wonderful look of stained glass about them, and the stickers have a glossy raised surface.  You can see a bit of the shine in the upper left on the second photo.  I was worried about them distorting but, as long as you're careful, you can lay them down gently and they fall into place perfectly.  Just be aware that static cling is an issue, and the stickers are drawn to your paper as soon as the two get close to each other :-)


For this rose I decided to go with a classic pink combination with a pretty yellow-green leaf.  The Copic background is actually lavender, but my camera turned it blue :-(  I hand trimmed my white card stock around the oval sticker, then layered it with a cute Doodlebug floral paper and a scallop-edged panel of black.  The focal piece was then popped up over a background of simple stripes and another layer of black.  I absolutely LOVE to use black as a base for papers, and go through it faster than any other color of card stock.  I like to buy the 50-sheet Recollections black card stock from my local Michael's - the price is excellent and the paper is thin enough to work very well in layering.


This closer look shows the delicate floral pattern on the pink paper.  I am a huge fan of Doodlebug and all of their adorable papers, and this tiny pattern is amazingly versatile.  I only had a few sheets of it and it's already gone - I guess I need to go shopping again :-)


Here you can see the focal panel is popped up just a bit over the background.  Again, I do this just about every time I make something, but it's such an effective way to add instant interest to a card!  It also draws your eye to the delicate scallops.  The minute I saw those dies I knew I had to have them, and I think they'll pop up in many future projects.

Again, I've complied a list of most of the items I used to create this card.  The roses were colored with my Copic Sketch markers, and if you'd like to know the colors I used please leave me a comment below.

Supplies I used:

Modern Blooms

This is a card that I just made recently.  I was playing around with MFT's (My Favorite Things) Modern Blooms stamp set and matching dies.  I think that it turned out really cute!


To start with, I cut a panel in Black Licorice card stock and then arranged some of the flower and leaf dies on it and ran it through my machine.  This created negative spaces in the panel.  I then glued a piece of Neenah Solar White card stock to the back of the black piece so that I could stamp the coordinating flowers and leaves, through the black layer and down on the white layer beneath.  This effect would be accentuated if I had bumped up the black panel on foam squares, but I didn't choose that this time.  I also ran into a bit of an issue because the red flower didn't exist in the stamp set!  Somehow, I had this random die in the envelope with the others, and used it on the black piece without realizing it.  When I was later stamping and saw my mistake, I grabbed a Fantastix coloring stick and used it to draw in my own flowers.  I think they look just fine :-)

When the stamping was done, I felt the panel needed something more, so I used my white gel pen to draw dashed stitch lines around all of the shapes.  This really helped tie them together, and I think gave the panel a cute sewing-pattern look.  To play up the pretty red flowers, I attached the panel to a sheet of red & white pinstriped paper, then tied on a double layer of red & white baker's twine and tied a double bow.  The finished panel was then bumped up on 3M foam tape over a coordinating green patterned paper and attached to a top-folding card base made from Neenah Solar White card stock.

As is often the case, adding a sentiment was the final step.  I decided on a little stitched-edge tag, then found 2 different Simon Says Stamp birthday sets to create a custom message.  I just tucked the tag under the bow (they aren't tied together) and then secured it with a piece of double-sided tape.  Viola!  A bright and happy birthday card that would work for just about anyone!

Here's a list of most of the items I used for this card:


SweetCynthy Color Crafts Template by Ipietoon Cute Blog Design and Homestay Bukit Gambang

Blogger Templates